
 |
| The finished dress |
I have given this dress the nickname "The Jellyfish" because while I was working on the skirt I noticed that it resembled the movements of a jellyfish when fluffing it up and down. And now that's just what I call it.

The next thing I did was cut out my tulle. I purchased 10 yards of 58" wide tulle. Each layer of the skirt was made from 2 panels 2 yards by approx 29" wide. I learned from the last time I used tulle in the petticoat for my Rose Tyler dress and avoided the sewing machine as much as possible.
After I had my pannels cut I stitched them together with my sewing machine, creating basically a 4 yard skirt that I gathered by hand.

I stitched all of the panels together, creating the layers at once so I could just gather, stitch to the basque, and repeat.


After I hand sewed about 4 layers on (which took I don't remember how many hours) I started to realize the skirt was poofing out too much at the hips. Personally I like this shape, it actually resembles the shape of my favorite version of the Star Princess dress from Phantom, but it's not the look I was going for.

I did some research and learned that tulle on romantic tutu's are usually sewn 1" apart where I had been sewing them at 1/2" apart. So I took out 2 rows of tulle, had to gather it again, and then stitched it on at 1" apart.
This gave me the silhouette I wanted and I kept going, moving onto the skirt lining next.

For my skirt lining I did a full circle skirt. I drafted the pattern to fit the measurement of the bottom of the basque instead of my waist. To draft the skirt I use this tutorial HERE, which I've used before and I love it!


After the skirt was cut out I zig zagged the edges to keep it from fraying and then I stay stitched the waistline. For those of you who don't know, stay stitching is just basting around curved edges. It helps keep the fabric from stretching out of shape.


Next I stitched the hooks and eyes on.

You'll notice that the hooks and eyes are alternating. I decided to do this after my first basque because they would come undone easily and this is a technique that's been used since theses little guys were invented.


After that I sewed the lining to the basque. For this basque I decided it would be easiest to sew the tulle on after I attached the lining. Which was the best decision I made.


After the lining was attached I started sewing tulle... again.

I decided against going ahead and making out the lines on the basque and free handed it. I didn't want to have to deal with washing the marker out under 5 layers of tulle. Overall I think I did pretty good at keeping it even, and you definitely can't see any of the imperfections when I'm wearing the dress.

This is the skirt with 4 layers of tulle and the mock up for the bodice. I ended up adding the 5th layer while I was working on the bodice.


This post is going to be about making the skirt. The skirt includes 10 yards of tulle and approximately 2 yards of 58" satin, and a whole lotta patience. I ended up having to make the skirt 3 times because it was made of tulle which meant I didn't do a mock up to work out the bugs. But you'll learn all about that if you keep reading.
***
This first part is the first time I made the skirt. I started out with making the basque, which is a piece of fabric that the tulle gets sewn onto and sits on the lower waist/hips. I made the first basque out of a pink broadcloth, which was my first mistake. I thought that the tulle would blend the color/fabric difference between the bask and the satin of the lining skirt. But I was wrong.
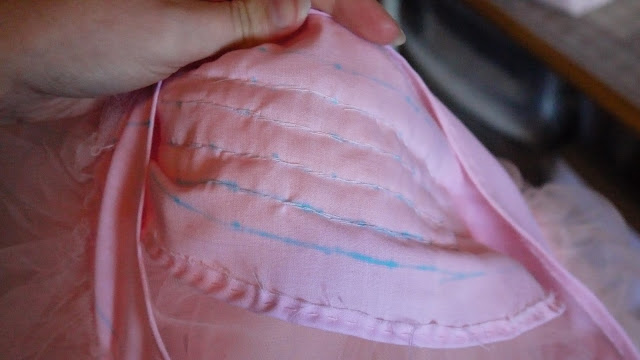
My basque is basically drafted the same way you would draft a 3/4 circle skirt. I didn't really know what other shape to use and it ended up working just fine. When the bask was cut I folded the edges over about 1/4 of an inch and hand sewed it down. After that I measured and traced out my rows where I would stitch the tulle, which were 1/2" apart.

The next thing I did was cut out my tulle. I purchased 10 yards of 58" wide tulle. Each layer of the skirt was made from 2 panels 2 yards by approx 29" wide. I learned from the last time I used tulle in the petticoat for my Rose Tyler dress and avoided the sewing machine as much as possible.
After I had my pannels cut I stitched them together with my sewing machine, creating basically a 4 yard skirt that I gathered by hand.

I stitched all of the panels together, creating the layers at once so I could just gather, stitch to the basque, and repeat.


After I hand sewed about 4 layers on (which took I don't remember how many hours) I started to realize the skirt was poofing out too much at the hips. Personally I like this shape, it actually resembles the shape of my favorite version of the Star Princess dress from Phantom, but it's not the look I was going for.

I did some research and learned that tulle on romantic tutu's are usually sewn 1" apart where I had been sewing them at 1/2" apart. So I took out 2 rows of tulle, had to gather it again, and then stitched it on at 1" apart.

This gave me the silhouette I wanted and I kept going, moving onto the skirt lining next.

For my skirt lining I did a full circle skirt. I drafted the pattern to fit the measurement of the bottom of the basque instead of my waist. To draft the skirt I use this tutorial HERE, which I've used before and I love it!


After the skirt was cut out I zig zagged the edges to keep it from fraying and then I stay stitched the waistline. For those of you who don't know, stay stitching is just basting around curved edges. It helps keep the fabric from stretching out of shape.

I added a lapped zipper to the skirt in the back. This was my first time doing one of these zippers and it turned out pretty good. Not the cleanest, but it all got covered in tulle anyways.

At this point I pinned the skirt lining onto the basque and I realized that the difference in types of fabric and the color difference was going to be obvious, so I made a new basque out of the same satin and, which also meant I would be restitching the tulle on again.
I made the basque the same way as the first, but this time I zig-zagged the edges


Next I stitched the hooks and eyes on.

You'll notice that the hooks and eyes are alternating. I decided to do this after my first basque because they would come undone easily and this is a technique that's been used since theses little guys were invented.


After that I sewed the lining to the basque. For this basque I decided it would be easiest to sew the tulle on after I attached the lining. Which was the best decision I made.


After the lining was attached I started sewing tulle... again.

I decided against going ahead and making out the lines on the basque and free handed it. I didn't want to have to deal with washing the marker out under 5 layers of tulle. Overall I think I did pretty good at keeping it even, and you definitely can't see any of the imperfections when I'm wearing the dress.


So there you have it! The skirt took approximately 12 hours, give or take a bit because I kept forgetting to time myself. I went through the entire BBC North & South mini series, at least 1 Star Wars movie, and a few episode of When Calls the Heart while working on this skirt.
I'll be posting the 2nd part of making The Jellyfish soon and pictures from my graduation party as well.
Thanks for reading!


