Apr 24, 2017

Making an 18th Century Inspired Dress Part 2 | Making the Bodice

Today I'll be talking about how I constructed the bodice of my 18th Century Inspired Dress. If you missed part one where I showed how I drafted the pattern, you can read it here.


With my pattern drafted, I cut out my pattern pieces from my fashion fabric and lining. My fashion fabric was a wonderful gray linen and for my lining I just used bleached muslin.

Fun fact: the linen fabric I used was actually from two curtain panels that I bought from Goodwill for $10. Second hand stores are a great place to look for cheap fabric if you know what to look for.


My notions consisted of 1 inch single fold bias tape and a couple of pieces of spiral steel boning. I usually use plastic boning/zip ties, but I had a couple pieces of spiral steel laying around from an old corset I took apart and they were the perfect length.


On my muslin lining I traced where I wanted my boning channels along the center front and stitched the bias tape on to create the boning channels. Below is what it looks like on the wrong side and the right side.


Then I stitched all my bodice pieces together out of both the muslin lining and my fashion fabric pieces. Once they were all stitched I ironed the seams flat.


Then, with right sides of both my lining and outer pieces together, I stitched with a 1/2" seam allowance along all of the outer edges, leaving a small opening (about 5") in the bottom of the center back so I could turn the bodice right side out.


After it was stitched I trimmed the corners and clipped the curved edges.


Once the garment was turned right side, out I folded the edges of the opening in the center back in by 1/2" and used an invisible whip stitch to close the opening.


The finished back edge.


Next, it was onto the sleeves! I also cut the sleeves out of both the fashion fabric and muslin for the lining. The first thing I did was sew them each separately along the seam line with right sides together. Then, placing right sleeve lining inside of the right sleeve with right sides together, I stitched along the cuff and turned it right side out.


After a quick iron, I top stitched by hand around the edge of the cuff.


I seem to have forgotten to take photo's of it, but the sleeves each have a small dart just above the elbow that helps shape the sleeve. If you want to know more about that you can read my post about my 1770's Polonaise which used the same sleeve pattern.

After this, I pleated the sleeves towards the back and set the sleeves into the bodice by hand.

At this point, I put the jacket on Trisha (below) for a quick look at how it was looking. I decided that the front needed to be top stitched, but other than that it was looking good.


I'm still happy with how it turned out, but there's a few things I wish I had done differently, like:
  • Pulled the side seam further back so it was visible in the back.
  • added more boning or flat lined with a stiff fabric.

And that's it for today's post. I'll be posting about making the skirt next week.

Apr 17, 2017

Making an 18th Century Inspired Dress Part 1 | Drafting the Bodice

Last month I had the inspiration to make something of my own design in an 18th century style. Like everyone else, I love the costumes from Outlander designed by Terry Dresbach, even though I've never watched the show. I particularly love Claire's outfit with the plaid skirt and embroidered stomacher, which I believe is from season 1. One of my favorite part of the Terry Dresbach's designs is the use of texture and all of the beautiful fabrics, so when I found a wonderful gray linen I knew I had to make something 18th century/Outlander inspired.

I did a couple of sketches before I came up with something I liked. I wanted something simple and not necessarily historical accurate, but with a historical feel, which I feel I accomplished.


As you can see, the dress changed a little bit between the sketch and the finished product. I didn't necessarily want a bodice that laces up like in my sketch, but I didn't know what I wanted to do until later in the process.

I want to walk through my process for drafting the pattern, as it's a step that a lot of people seem to skip over, but is a very important part, and that's what today's post will be focusing on.

The first step in making this was to draft up my pattern. I based my bodice very loosely off of a pattern from Janet Arnold's Patterns of Fashion 1: Englishwomen's Dresses and Their Construction C. 1660-1860. The patterned I used as a reference is an "Undress" jacket. 


For this costume I decided to use two 18th century petticoat's over top of an 18th century bum roll to get the right silhouette. It's important that you have the proper under garments on your dress form when you're drafting so that your pattern will lay properly with all the layers. I didn't bother put my stays (18th century corset) on the dress form because my dress form is solid and they wouldn't do anything.

This method of drafting is done directly on the dress form by pinning ribbon onto the dress form where the seams will be on the garment. You only have to draft on one half of the dress form since the pattern will be the same on both sides.

I'd like to note that the front lines of my bodice is a little bit more defined and sharp than it is in the finished bodice. I was going for a different shape when I started and didn't change that line until after I finished drafting the pattern.


Once I had my seam lines tapped, it was time to start drafting the muslin. This pattern consist of 2 bodice pieces, so I cut out two separate pieces of muslin a few inches wider than the widest part on the dress form and a few inches longer.

The front panel -  I pinned it straight down the middle to hold the muslin block in place. I smoothed it out the best I could around the arm and over the side back, pinning it tight just past the side seam tape marking. There was a bit of excess fabric around the bust, which I pinned into a bust dart which I would remove on the pattern.

After everything was laying smoothly I proceeded to mark over the ribbon seam line with my sewing pen. Once all the line's were marked I removed the muslin from my sewing form (but left my bust dart pinned) and traced a half inch seam allowance around every seam and cut it along that line.

The back panel - The back was done in relatively the same way, except before I started I drew a straight line 1 inch away from the back edge in pencil (this should have been done on my front panel, but I was rushing and forgot), which served as my center back line. Even though the back was two separate pieces with a seam in the center back, I needed this as a guideline to lay my muslin on straight.

Once my muslin block was pinned along the center back, I smoothed out the rest of the block to lay flat against the dress form. Once there were no wrinkles I traced over the ribbon markings, removed it from the sewing form, added a half inch seam allowance, and cut it out.


I pinned the pieces together at the seams to see how everything was fitting. Overall it fit well with the exception of the neckline *sigh* and the back neckline where it met at the front shoulder piece. I made a few adjustments to fix these things, leveled the bottom edge hem, and traced it onto paper, creating my pattern.


In the end, my pattern ended up looking something like this. The pattern I used for my sleeve's is the same pattern I used for my 1770's Polonaise, which you can read about here.

I'm still learning the art of pattern draping/drafting, but I hope this was helpful.


More posts about the making of this dress will be coming soon, so be sure to check back!

What's your favorite method for drafting patterns? Let me know in the comments!

Apr 10, 2017

My Story

For the majority of my life I didn't know what I wanted to do. I've always been drawn towards film and in more recent years towards theatre, but I was never one of those kids that from the age of 3 knew exactly what I wanted to do. It seems like the majority of people you talk to or read about online knew since they were a toddler exactly what they wanted to do. And for someone who never had a clue, it was a bit worrying to be graduation high school with no idea of where they want their life to go. So if you can relate, know that you're not alone.

I've been doing some re-branding with my costuming on the web lately, and while I was updating my blog I had the idea to add a page titled "My Story" with... Well, my story. After I finished it I thought it would make a good blog post, hence this post.


So, how exactly did I get into costuming? Let me tell you a little (er, long-ish) story...

Growing up I didn't have any idea what I wanted to do for a career. When I was 6 I wanted to work as Snow White at Disneyland and when I was older I wanted to be Indiana Jones... Er, an archaeologist. But I decided that archaeology wasn't exciting enough in the real world and continued life without having a clue, or really caring much.


Me with my hero, Snow White, at Disneyland in 2001

Life continued and I started making short films with my sisters and brother, which eventually lead to making a few with friends, which lead to, well, no where actually. I was drawn towards the costumes, especially when we made a film about a princess's coronation in a fantasy land. There was fancy dresses, a murderous plot, and terrible acting. This video remains safely hidden on YouTube where no one can ever see it. Thank goodness.


You would think I would start to get a clue around this time that I was drawn to costumes. But no. I knew I was interested in film making in general, but that was it.

Then in 2010 (or maybe 2011, or was it 2009? I honestly don't remember) I saw a friend's costumes that she had put together at a homeschool fair and I had a total "ah-HA!" moment. I remember thinking to myself  "that's what I want to do. I want to make costumes!"

At the time I had absolutely no sewing experience, so I asked my mom to teach me. She pulled out the old sewing machine, which was probably from the 70's from the yellow plastic and ancient looking design. My mom taught me what she knew, which was only the sewing basics and I started making all kinds of small projects - bags, pillows, and clothes for my stuffed animals.

Eventually I became bored with these trivial projects and I decided that I wanted to make a dress. I decided a nightgown would be the perfect first "real" project for me, so my mom and I went to the fabric store together and picked out a Simplicity pattern, which should have been simple enough, but would soon drive us nuts. I never finished the nightgown and there were several moments when I wanted to run away screaming because the pattern just didn't make sense. I still don't like working with commercial patterns to this day and it's largely because of this project (thanks Simplicity).

Well, fast forward three pillows, six bags, and a whole stuffed animal wardrobe to May 1st 2012 when I decided I wanted to celebrate May the 4th (Be with You) - AKA Star Wars Day - by making a costume. I had found a lovely tutorial/walk through someone made for Leia's senatorial gown from A New Hope and decided to give it a shot.

My mom and I made a quick mock up (my first mock up - yay!) out of some old tan sheets and went shopping the next day for materials. We searched all over for a suitable fabric, but since neither of us had any clue about fabric types and had a budget the size of a grain of sand we ended up buying some  white sheets. For our first real project and making it in 3 days, it actually turned out fairly good. All things considered. I mean, it was easily recognizable as Leia. So that counts as a win, right?

And that, my friends, was my first ever costume. I continued sewing and continued creating my own patterns vs. using a purchased pattern. I learned mostly just from trial and error for those first few years but as I progressed I started researching and reading more, both books and blogs to try and build my skill even further.

My 2nd project, Danielle de Barbarac from Ever After

As I continued, costuming soon became something more than just a little hobby. I spend the majority of my time sewing, researching, thinking, dreaming... Okay, you get the point.


Then in last year I was asked by a group of film makers known as Rogue Zohu (who happen to be the same film makers I made the princess/coronation/murder short I mentioned before with years ago. Needless to say, they improved much between then and 2016) to be Wardrobe Assistant for their short film Save Lives. Apologize. I quickly said yes. There may or may not have been some excited squeals that day.

That project is one of my best memories and favorites because it was that weekend when I discovered that costuming was what I wanted to do with my life. For the first day of filming I was in charge of dressing 20+ extra's, which consisted of elementary aged children, in 70's clothing. It was chaotic, exhausting, a little stressful (thank goodness for our amazing AD! I would have been lost without her), but mostly fun. Okay, all fun.

After that first day of shooting and on the way back to our home for the weekend (we were staying at a friends house for the shoot) I just knew that that was what I wanted to do. There was no doubt. Since then I've been digging further into costuming.


And that's my story.

Now when people ask me what I want to do with my life I can finally give them an answer. Though I'm past the age when people ask that the most (right after you finish High School and "should" be getting ready for college and your future career), but I still have to dodge the question of "are you in college?" #homeschoolerproblems

How about you? Have you always known what you wanted to do? Or are you like me and have/had no idea?

Apr 3, 2017

Making the Skirt and Sleeves | 1770's Robe a la Polonaise

Continuing my posts on the making of my 1770's Robe a la Polonaise, today I'll be showing how I made the sleeves the skirt. If you haven't read my first post about making the bodice, you can read it here.


After my bodice was constructed it was time to get started on the sleeves! When editing my photos I realized I didn't take as many photos of the sleeves as I should have, so I'll attempt to explain anything I don't have photo's of. Hopefully it will all make sense.

Like the rest of my bodice pieces, I cut the sleeves out of both my fashion fabric and muslin for the lining.

Once the pattern pieces were cut I made sure to mark the sleeve dart (below) onto the right side of my muslin pieces.

Once the pieces were cut, I stitched each of the sleeves individually, right sides together. Then, taking two matching sleeve pieces (lining and fashion fabric), I placed the lining inside of the fashion fabric piece with right sides together and stitched around the edge/cuff. Once it was stitched I clipped the curves and turned it right side out then turned the lining into the sleeve so that wrong sides were together on the inside.

At this point I top stitched around the edge of the sleeve. After that, I pinned down the dart, following the makings on the inside of the sleeve from my pattern. I top stitched along the top, stitching the dart into place.


Next I began working on the sleeve ruffles. Janet Arnold's pattern had large, frilly, ruffled cuffs with a scalloped edge with two layers for each sleeve. Below is the pattern I had drafted based on the one from Patterns of Fashion.


The fabric I used was a cotton voile I purchased in L.A. last year at Costume College. It's very light weight and has a wonderful drape and I knew I had to use it for this.
 
Once the pieces were cut, I began trying to hem the edges. Due to the round/scalloped edge it made hemming difficult and I quickly realized it would be more trouble than it was worth to trying and hem all four pieces and I decided on an alternate plan; a straight edged, plain ruffle. Easy and simple.

I started by cutting the ruffle pieces I had already cut down to straight strips. I cut two on the fold, an approximate length of 26" long by approx. 2.5" wide.

I hemmed the bottom edge with a 1/4", folded over twice and stitched down by hand. Then along the top I machine stitched a gathering/baste stitch.


I also cut another two strips for the cuff of the ruffle. With right sides together, I stitched the cuff to the ruffle, then folded the cuff in half, covering all raw edges, and machine stitched it down.


 Then with right sides together, I stitched the ruffle together.

After that, I hand stitched the ruffle cuff's into my sleeve's.

The skirt is made up of 2 rectangular panels, approximately 2 yards by 42" long each. My original plan was for each panel to only be about 1 1/2 yards long, but when I got my fabric and realized I didn't have enough for trims anyways, I used all that wasn't being used for the bodice and sleeves to make it extra full. This is probably a little more fabric that is needed, but I like how full it is.

With my two panels cut, I measured 3" down from where the center back seams would be and marked with pencil at an angle until it was even with the original edge of the fabric, creating a downgrade (hopefully this makes sense). This is because the center back of my dress dips down, and to keep the skirt even and to make it lay right, it needs to be that much shorter in the back and sloping on the sides.


Once that was done, I stitched the center back seam with right sides together, finishing at my 3" mark. After that, I hemmed the front edges of the skirt, folding the edge over 1/2" and over another 1/2" and machine stitched it. If I were to do this again I would definitely sew this part by hand because the stitching is more obvious than I thought it was going to be on the finished dress.

Now it was time to pleat the skirt. I attempted to measure everything out with math to calculate exactly how many please and what size they needed to be, but I wasn't able to figure it out and my head began to hurt from all the numbers (math and I aren't very good friends). Instead I did the pleats by eye, measuring approximately how long the bodice edge was and adjusting as needed. The hardest part of doing it this way is making it even on both sides. But after a couple of hours I got all tidy and even.

For some reason at this point I didn't base my pleats down and instead stitched them right into the dress. I usually (and would recommend) basting your pleats once you have them pinned the way you want before attaching it to the bodice. This is also a good time to iron them, before you stitch it to the dress, that way you can get them all nice and flat easily.


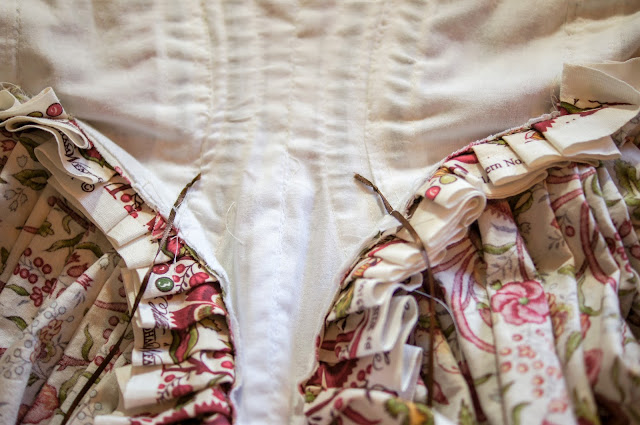
I stitched the skirt to the bodice by machine, using a 1/2" seam allowance from the edge of the bodice.

At the bottom of the center back of the bodice, I had to hand sew the tip. I chose to hand sew this section because I didn't want to risk getting any of the pleats in the wrong position with my machine, and you have so much more control when sewing by hand.


At this point I also attached the skirt loops, which in my case was a few feet of brown ribbon. I stitched them onto the seam allowance of the inside of the bodice. These are to hold the skirt up in the back by looping around buttons on the outside.


Next was time to finish up the bodice, starting with the rest of the bottom edge. I did a small rolled hem, trying to keep it as close to a 1/4" fold as I could and then stitched it down by hand going just past where the skirt starts.


I did the same thing with the bottom edge and then the center front edge, though with a slightly larger seam allowance at 1/2" folds.


After that, all that was left was to sew on a couple of buttons and hem the skirt (which unfortunately I didn't get any photo's of, though it's pretty simple), which I did by hand with an invisible stitch.


And that's it!

After I figure out what to accessories this with (mainly figure out what to do with my hair) I'm hoping to get photo's of me actually wearing this soon.